I was editing a web page on Power Pages the other day and my business requirement was to hide a quick view and make it visible under certain circumstances. However, I found that when those requirements occurred, the quick view was all small and could not be seen. I figured I’d look for something like we can do for lists, wait until it is loaded.
I was at a loss to find this in the documentation but after digging in the source code I was happy to find a solution to this and able to use it to hide my quickview when the event occurred.
Why would you want to implement Virtual Entities in the Dataverse? What if they could be used to simplify your data model to make it easier and faster to find things? Here, we’ll see why and how to leverage this tool.
What are virtual entities used for?
Overall, virtual entities can be used to surface data in the Dataverse without storing it there (hence the term virtual). The example provided in the documentation is getting files available in Dropbox surfaced in a subgrid. They can also be used for surfacing entities that are already in the Dataverse by regrouping information together in a different form. Consider the following two scenarios.
Two examples of uses for virtual entities
a) Virtual entities – Regrouping quote benefits across quotes
To begin with, a first situation where virtual entities can be useful is in the creation of queries. There is no doubt that document automation saves a lot of time. However, various problems can slow down this functionality. When this is the case, some reports can be painfully slow to run. And that takes away from the customer experience.
We encountered this problem when designing our TANDEM solution. Sometimes, it could take up to 5 minutes to produce one document. Moreover, the report was complex, gathering information from related entities two levels deep (1=>N=>N), resulting in multiple queries. It seems that this is where the delays came from.
In this case, we had an insurance policy, and its renewal. The renewal was related to several quotes, all of which have different quote benefits (for example, Life Insurance, Dental coverage, and Health coverage). In one row, we wanted to present all the quote benefits for Life Insurance of the different quotes related to that renewal of the policy. And similarly, another row for dental coverage, and another for health coverage.
To solve this problem, we created a virtual entity which made the necessary queries using FetchXML Builder and surfaced the information in a virtual entity view ready to be consumed by the report, dropping its generation time to a few seconds.
b) Virtual entities – Dynamically filtering the view in a subgrid
Another situation where virtual entities can be used is to fulfill the need of changing the FetchXML of a subgrid dynamically based on filtering criteria. This seems to be difficult to do in a supported way. It would be possible to create a UserQuery view (viewSelector.setCurrentView()) on the fly to do this or to override the RetrieveMultiple message with a plugin.
However, it is also possible to use a virtual entity (and I would argue simpler) to simply present the data of the real entity and do the filtering in the background. Consider for example a view that filters based on a value on the form. The view links to the current record and is refreshed when the field value changes (after a save). The virtual entity supports the operation.
How to implement virtual entities?
The initial setup for creating a virtual entity is well described here in a 4-part series. If you choose to do this, it would be better to use only one virtual data provider for all the virtual entities, otherwise you cannot relate them together. This means, for instance, that if you have a virtual contact lookup on a virtual account, you need to use the same provider for the Dataverse to accept that kind of lookup.
1. Detailed Steps
Let’s see how to implement this step by step. First, overall, we will show accounts under another account. For the simplest example possible, we could show the accounts under the parent account of the current one. In the figure below, we would see all four accounts below the parent account, namely Adventure Works, Fourth Coffee, Fabrikam and Litware.
1a) First let’s register a new data provider using the latest plugin registration tool.
1b) From there, we also create a new data source entity.
1c) This data source can be reused on all virtual entities, should we have more than one.
1d) Pick your assembly and the class where the code of the plugin runs.
1e) Add a record to indicate the source.
1f) Select your Data Provider from the list and create the record.
It should look like this once created:
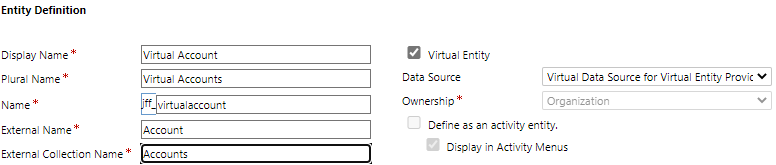
2. Now create the virtual entity
2a) Tick virtual entity and choose the data source record you just created.
2b) Create the following field:
Lookup to Account, jff_realacountid
2c) Create you plugin project and add the following two Nuget packages:
2d) You will need a visitor:
using Microsoft.Xrm.Sdk.Query;
using System;

namespace Dataverse.CustomPlugins
{
    public class VirtualAccountVisitor : QueryExpressionVisitorBase
    {
        public Guid RealEntityId { get; private set; }
        public PagingInfo PageInfo { get; private set; }
        public ColumnSet ColumnSet { get; private set; }

        public override QueryExpression Visit(QueryExpression query)
        {
            var filter = query.Criteria;
            if (filter.Conditions.Count > 0)
            {
                foreach (ConditionExpression condition in filter.Conditions)
                {
                    if (condition.Operator == ConditionOperator.Equal && condition.Values.Count > 0)
                    {
                        if (condition.AttributeName == "jff_realacountid")
                        {
                            if (condition.Values[0] is Guid)
                            {
                                Guid realEntity = (Guid)condition.Values[0];
                                RealEntityId = realEntity;
                            }
                        }
                    }

                }
                if (query.PageInfo != null)
                {
                    VisitPagingInfo(query.PageInfo);
                }
            }
            return query;
        }

        protected override PagingInfo VisitPagingInfo(PagingInfo pageInfo)
        {
            PageInfo = pageInfo;

            return pageInfo;
        }
    }
}
2e) And you will also need the provider:
using Microsoft.Xrm.Sdk;
using Microsoft.Xrm.Sdk.Query;
using System.IO;
using System.Text;
using System.Xml;

namespace Dataverse.CustomPlugins
{
    public class VirtualAccountProvidder : PluginBase
    {
        public VirtualAccountProvidder()
        {
            RegisterEvent("jff_virtualaccount", EventOperation.RetrieveMultiple, ExecutionStage.MainOperation, RetrieveVirtualAccounts);
        }

        private void RetrieveVirtualAccounts(LocalPluginContext localContext)
        {
            var virtualQuery = (QueryExpression)localContext.PluginExecutionContext.InputParameters["Query"];
            VirtualAccountVisitor visitor = new VirtualAccountVisitor();
            virtualQuery.Accept(visitor);
            EntityCollection ec = new EntityCollection();
            localContext.TracingService.Trace($"Guid referenced is {visitor.RealEntityId}");
            localContext.TracingService.Trace(virtualQuery.ToString());
            var parent = localContext.OrganizationService.Retrieve("account", visitor.RealEntityId, new ColumnSet("parentaccountid"));
            var parentaccount = parent.GetAttributeValue("parentaccountid");
            if (parentaccount != null)
            {
                string query = $@"<fetch> <entity name='account' > <attribute name='accountid' /> <attribute name='name' /> <filter> <condition attribute='accountid' operator='under' value='{parentaccount.Id}' /> </filter> </entity> </fetch>";
                EntityReference sourceEntityReference = new EntityReference("account", parentaccount.Id);
                EntityCollection sourceEntityCollection;
                if (visitor.PageInfo != null)
                {
                    string xml = CreateXml(query, visitor.PageInfo.PagingCookie, visitor.PageInfo.PageNumber, visitor.PageInfo.Count);
                    sourceEntityCollection = localContext.OrganizationService.RetrieveMultiple(new FetchExpression(xml));
                }
                else
                {
                    sourceEntityCollection = localContext.OrganizationService.RetrieveMultiple(new FetchExpression(query));
                }

                foreach (var entity in sourceEntityCollection.Entities)
                {
                    Entity virtualEntity = MapVirtualEntity(sourceEntityReference, entity);

                    ec.Entities.Add(virtualEntity);
                }
                ec.TotalRecordCount = sourceEntityCollection.TotalRecordCount;
                ec.PagingCookie = sourceEntityCollection.PagingCookie;
                ec.MoreRecords = sourceEntityCollection.MoreRecords;
            }
            localContext.PluginExecutionContext.OutputParameters["BusinessEntityCollection"] = ec;
        }

        private Entity MapVirtualEntity(EntityReference sourceEntityReference, Entity sourceEntity)
        {
            Entity virtualEntity = new Entity("jff_virtualaccount");
            virtualEntity.Attributes.Add("jff_virtualaccountid", sourceEntity.Id);
            //virtualEntity.Attributes.Add("id", sourceEntity.Id);
            virtualEntity.Attributes.Add("jff_realacountid", new EntityReference(sourceEntity.LogicalName, sourceEntity.Id));
            virtualEntity.Attributes.Add("jff_name", sourceEntity.Attributes["name"]);
            return virtualEntity;
        }

        public string CreateXml(string xml, string cookie, int page, int count)
        {
            StringReader stringReader = new StringReader(xml);
            var reader = new XmlTextReader(stringReader);

            // Load document
            XmlDocument doc = new XmlDocument();
            doc.Load(reader);

            return CreateXml(doc, cookie, page, count);
        }

        public string CreateXml(XmlDocument doc, string cookie, int page, int count)
        {
            XmlAttributeCollection attrs = doc.DocumentElement.Attributes;

            if (cookie != null)
            {
                XmlAttribute pagingAttr = doc.CreateAttribute("paging-cookie");
                pagingAttr.Value = cookie;
                attrs.Append(pagingAttr);
            }

            XmlAttribute pageAttr = doc.CreateAttribute("page");
            pageAttr.Value = System.Convert.ToString(page);
            attrs.Append(pageAttr);

            XmlAttribute countAttr = doc.CreateAttribute("count");
            countAttr.Value = System.Convert.ToString(count);
            attrs.Append(countAttr);

            XmlAttribute returnTotal = doc.CreateAttribute("returntotalrecordcount");
            returnTotal.Value = "true";
            attrs.Append(returnTotal);

            XmlAttribute version = doc.CreateAttribute("version");
            version.Value = "1.0";
            attrs.Append(version);

            XmlAttribute output = doc.CreateAttribute("output-format");
            output.Value = "xml-platform";
            attrs.Append(output);

            XmlAttribute mapping = doc.CreateAttribute("mapping");
            mapping.Value = "logical";
            attrs.Append(mapping);

            XmlAttribute distinct = doc.CreateAttribute("distinct");
            distinct.Value = "false";
            attrs.Append(distinct);

            XmlAttribute nolock = doc.CreateAttribute("no-lock");
            nolock.Value = "false";
            attrs.Append(nolock);

            StringBuilder sb = new StringBuilder(1024);
            StringWriter stringWriter = new StringWriter(sb);

            XmlTextWriter writer = new XmlTextWriter(stringWriter);
            doc.WriteTo(writer);
            writer.Close();

            return sb.ToString();
        }
    }
}
2f) This works as expected when added to the form.
You can see that this can be used to solve the problem mentioned earlier to show related records. This would not be possible out-of-the-box due to the limitations of subgrids. For this reason, virtual entities are a powerful addition to the Dataverse!
This article was originally posted here and is archived over here.
Need to generate PDF reports as part of your job? Then you’ll love Aspose.Words. Here’s how to create your reports with this affordable, easy-to-use tool.
In this article, I’ll explain how to create reports usingAspose.Words, a powerful tool for presenting complex data in a variety of ways. Why do I love using it? First, because it’s easy to maintain (one Word document per report). And second, because it generates documents at warp speed—a matter of seconds in the architecture proposed here. So far, I’ve used it for a web project, but here I’ll explain a simple way to use it within the Dataverse or Dynamics 365.
Basic Architecture
Unfortunately, we can’t integrate the Aspose library directly. Why not? Because we can’t merge two libraries together (for example, plug-in library and the libraries needed for Aspose). It would work, but it’s not supported by Microsoft. So, what’s the solution? If you look at the figure of the basic architecture above, you’ll see that we can create an Azure function into which we feed the data, which will generate as a report.
Aspose.Words: A simple example
Want concrete examples? Using sample data, I thought I would show you what I can do in my own environment. First, I click on the Get pdf button to save the PDF to the disk.
My Dataverse environment
In the example above, I used a Word document containing a table. For each of the accounts, the contacts are presented as book titles.
Author
Book
<<foreach [a in entities]>><<[ _primarycontactid_valueODataCommunityDisplayV1FormattedValue]>>
<<[a.name]>><</foreach>>
It gives the following output:
Author
Book
Yvonne McKay (sample)
Fourth Coffee (sample)
Susanna Stubberod (sample)
Litware, Inc. (sample)
Nancy Anderson (sample)
Adventure Works (sample)
Maria Campbell (sample)
Fabrikam, Inc. (sample)
Sidney Higa (sample)
Blue Yonder Airlines (sample)
Scott Konersmann (sample)
City Power & Light (sample)
Robert Lyon (sample)
Contoso Pharmaceuticals (sample)
Paul Cannon (sample)
Alpine Ski House (sample)
Rene Valdes (sample)
A. Datum Corporation (sample)
Jim Glynn (sample)
Coho Winery (sample)
Aspose.Words: A complex example
Now, let’s get a little more complicated… In our in-house software TANDEM, designed for insurance agents, the most complex reports take around 20 minutes to generate. To generate the reports, we use XPertDoc, which is very powerful when it comes to transforming data; however, the license is very expensive. It’s also hard to maintain and difficult to develop, which is why we’re looking at alternative solutions.So, after two days of work and a quick re-design in Aspose.Words… here we are! It now takes no more than 20 seconds for the new report to generate (first cold call to the Azure function), and after that, literally 2 seconds. Here’s the Word template:
a) Right-click on the Azure function project and select Publish.
How to publish
b) In the options, make sure to stay in the Consumption Plan. As you can see here, the Premium Plan has no cold starts. For a project like this one, I’ve found that a cold start takes about 18 seconds.
3. Add Aspose.Words
Then add the Aspose.Words package from NuGet.
a) To do so, right-click and select Manage NuGet Packages.
Go to NuGet Package manager
b) Once there, find Aspose.Words and add it.
Of course, instead of Uninstall, you’ll see Install (I already have Aspose.Words installed).
4. Store Word templates in a stored class
To store Word templates in Azure, I opted to put them in a class stored as a Base64 string. You can read all the Word templates using an iterative process like this and then encode them as follows:
        private static string ProcessFile(string filePath, string listing)
        {
            Stream stream = File.OpenRead(filePath);
            BinaryReader binReader = new BinaryReader(stream);

            // Read and verify the data.
            byte[] bytes = binReader.ReadBytes((int)stream.Length);
            var fi1 = new FileInfo(filePath);

            listing += $"        static string {fi1.Name.Replace(".docx", "")} = @\"{Convert.ToBase64String(bytes, Base64FormattingOptions.InsertLineBreaks)}\";";
            listing += @"
";

            return listing;
        }
5. Use a POST request
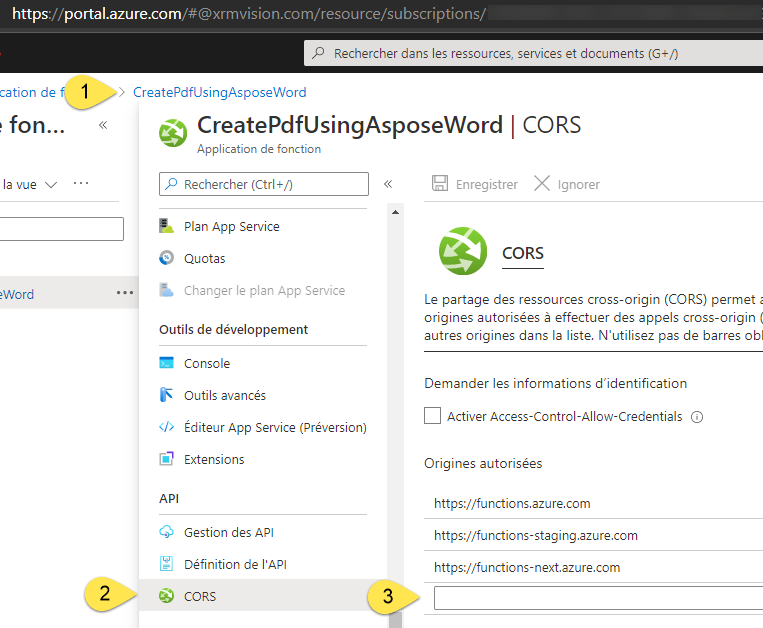
The reason I didn’t use a GET request is because the URL seems limited in length to around 2,048 characters. I opted for a POST request instead. That way, there’s no limit because we can use the document body as a template. However, we have to configure the Azure function to accept CORS (Cross-Origin Resource Sharing).
This is done in the Azure portal by following the two steps below:
b) Then, open the function in the Azure portal and add the Dataverse URL as an accepted origin.
And there you have it!
Building a Dataverse project
Now let’s look at the Dataverse solution, which shares the model project. Here are two options available to you:
1. The AJAX method
We can make a POST request using AJAX, but this returns the results in the query area rather than a web page. However, the results of the AJAX request can be fed to the out-of-the-box Dataverse Jscript function to download the file to disk, thus saving the report.
 Xrm.WebApi.online.execute(jff_GetBookListRequest).then(
            function success(result) {
                if (result.ok) {
                    result.json().then(function (parsed) {
                        $.ajax({
                            type: "POST",
                            url: "https://createpdfusingasposeword.azurewebsites.net/api/CreatePdfUsingWordTemplate?name=ContactByAccount",
                            data: parsed.Model
                            ,
                            crossDomain: true,
                            "Access-Control-Allow-Origin": Xrm.Page.context.getClientUrl(),
                            headers: {
                                accept: "application/json",
                                "Access-Control-Allow-Origin": "*"
                            },
                            success: function (r) {
                                var openOptions = { openMode: 2 };
                                var fileOptions = {
                                    fileContent: r.fileContent,
                                    fileName: r.fileName,
                                    mimeType: r.mimeType
                                };
                                Xrm.Navigation.openFile(fileOptions, openOptions).then(function () {
                                    console.log("File downloaded successfully.");
                                }, function () {
                                    console.log("File was not downloaded.");
You should replace createpdfusingasposeword with the name of your own Azure function and include jQuery in the location where your function is called from (form or list of records) so that the $.ajax is available.
2. Use a plug-in
We can also use a plug-in, namely a Dataverse library. In fact, a Jscript function can trigger an action to fetch the JSON data and send them to the Azure function. The action can be triggered by an entity, a list of entities, or with no context at all. The command may be to get all entities of a certain type, for example, the list of accounts and their primary contacts. Since we cannot include NewtonSoft, we must use JsonSerializer, which is sufficient for our needs.We also need to redefine all our models, since we can’t use the XRM SDK types in the Azure function. That said, it’s not very complicated.Here’s a simple example:
public class GetModelForAllBooks : PluginBase
    {
        public GetModelForAllBooks()
        {
            RegisterEventOnAllEntities("jff_GetBookList", ExecutionStage.PostOperation, GetBooks);
        }

        private void GetBooks(LocalPluginContext context)
        {
            var ec = context.OrganizationService.RetrieveMultiple(
                new QueryExpression("account")
                {
                    ColumnSet = new ColumnSet("name", "primarycontactid")
                });
            ListAccountsModel list = new ListAccountsModel();
            foreach (var e in ec.Entities)
            {
                Models.EntityReference contact = (Models.EntityReference)e["primarycontactid"];
                list.entities.Add(new Models.Account()
                {
                    _primarycontactid_valueODataCommunityDisplayV1FormattedValue = contact?.Name,
                    name = (string)e["name"]
                });
            }
            var ms = new MemoryStream();

            // Serializer the User object to the stream.
            var ser = new DataContractJsonSerializer(typeof(ListAccountsModel));
            ser.WriteObject(ms, list);
            byte[] json = ms.ToArray();
            ms.Close();


            context.PluginExecutionContext.OutputParameters["Model"] = Encoding.UTF8.GetString(json, 0, json.Length);
        }
    }
Now, the Azure function will take the model JSON, and using the data and the corresponding Word document, create an output PDF document, which it will return to the Dataverse.To the user, it looks very simple:
In short…
After working with Aspose.Words full time for 3 months now, I’ve found it a great product for generating reports using data models already used in websites. It can easily be used to create reports in the Dataverse and use an Azure function. Some other advantages are the reasonable license fees and the fast output speed.But above all, it’s very easy to use and will save you a considerable amount of time. Enjoy!
This article was originally posted here and is archived over here.
Developers and architects, are you developing an application with Dynamics 365? How can you make sure to focus on the use cases of the application in the context of the business domain and not on the way it is achieved? Learn more on dependency injection and inversion of control to achieve this.
Typical focus – Implementation details hiding the use case
I will focus on the implementation of this concept in Dynamics 365 because the way plugins are written presents a bit of a challenge to put this into practice. Indeed, the architecture of a plugin seems to resist inversion of control. Let’s use the following example. When an account is created, we want to create a follow-up task to check in with the account holder in a week. (This is an example plugin from the Dynamics 365 Software Development Kit and simplified using my colleague’s PluginBase.) Normally, when writing a plugin, we would focus on the event that occurs, for instance, the creation of an account, and write the necessary logic to create a task. Reading the code is then necessary to understand its purpose. Now let’s introduce the inversion of control principle. When an account is created, the task is also created, but I do not know how; I just want to know that it is created. The idea is to abstract away the implementation details. Why? Because implementation details should depend on the use case, and not the other way around. This keeps the code focused on what it is supposed to do. Before any adjustments, the code would look like this, which means we must read it to understand its purpose:
Before
 namespace PowerApps.Samples
{
    public sealed class FollowupPlugin : PluginBase
    {
        public FollowupPlugin()
        {
            RegisterEvent("account", EventOperation.Create, ExecutionStage.PostOperation, Execute);
        }
        public void Execute(LocalPluginContext pluginContext)
        {
            try
            {
                // Create a task activity to follow up with the account customer in 7 days.
                Entity followup = new Entity("task");

                followup["subject"] = "Send e-mail to the new customer.";
                followup["description"] =
                    "Follow up with the customer. Check if there are any new issues that need resolution.";
                followup["scheduledstart"] = DateTime.Now.AddDays(7);
                followup["scheduledend"] = DateTime.Now.AddDays(7);
                followup["category"] = pluginContext.PluginExecutionContext.PrimaryEntityName;
                followup["regardingobjectid"] =
                new EntityReference(pluginContext.PluginExecutionContext.PrimaryEntityName, pluginContext.Target.Id);

                // Create the task in Microsoft Dynamics CRM.
                pluginContext.TracingService.Trace("FollowupPlugin: Successfully created the task activity.");
                pluginContext.OrganizationService.Create(followup);
            }
            catch (Exception ex)
            {
                throw;
            }
        }
     }
}
Converting from implementation details to use case first logic
The first step to implement inversion of control is to move the implementation details away into another class. I will then be able to test this class without using Dynamics CRM (making it a unit test instead of an integration test).This is what it looks like after moving the logic into another class:
namespace PowerApps.Samples
{
    public sealed class FollowupPlugin : PluginBase
    {
        public FollowupPlugin()
        {
            RegisterEvent("account", EventOperation.Create, ExecutionStage.PostOperation, Execute);
        }
        public void Execute(LocalPluginContext pluginContext)
        {
            ICreateTaskOnAccountCreationCommand createTask = new CreateTaskOnAccountCreationCommand();
            createTask.Execute(pluginContext);
        }
     }
}
After moving away into another class – 3 files
We can see here that the purpose of the plugin is clear. The interface is illustrated below and the concrete class CreateTaskOnAccountCreationCommand implements it essentially in the same way as before.
Integrating Ninject in your Dynamics 365 Plugin project in a supported way
I have previoulsy worked on a project that did not have dependency injection. In such a situation, creating the objects become burdensome when the constructor has 10 or more parameters. This is where dependency injection comes into play. To remove the dependence on the implementation details, we give Ninject the mandate of creating the instance of the class. This inversion of control framework is usually included by using Nuget to import its library. However, because Dynamics 365 does not support the merging of mutiple libraries, this solution isn’t possible. As a workaround, we can download all the source code for Ninject, copy all the source files (*.cs) to our project, and start using it in the same way. No merging of libraries is required, and the Ninject license allows us to do this. In order to abstract away the implementation details and no longer be tightly coupled to them, meaning that the plugin will no longer show how the details are implemented, we start using Ninject. Why would we do this? Because it has the advantage of hiding the implementation details. So what? Well, now we can swap them out with another implementation, as needed. And we can test the implementation independently of Dynamics 365.
Introducing Dependency Injection with Ninject
The key parts are adding the dependency resolver, Ninject, and binding the interfaces to their implementations. To do this we add a reference to Ninject:
public class NinjectContainerFactory
    {
        public IKernel Create()
        {
            return new StandardKernel();
        }
    }
Creating an instance of a class with Ninject
Now in this way, the plugin does not know how the task creation is implemented, but upon reading the code, we know that this is what is intended. The inversion of control is performed by Ninject:
This means that when I want to run the logic that is, to actually create a task upon the creation of an account, Ninject will create an instance of the CreateTaskOnAccountCreationCommand class. It makes the link between the interface that tells me that I want to execute the command and how to actually do it. This has the advantage of allowing us to swap an implementation out for another by simply changing the Dependency Resolver. Finally, Dependency injection means that Ninject creates the objects with all their members for us. If that were not the case, things would be more tedious. For example, we could refactor this code into smaller parts: so that task creation would be one class, and an orchestrator that invokes it upon the account creation would be another class. Now you might say this is overkill for such a simple need, but for more complex projects with many dependencies, this becomes interesting very quickly. Here is the orchestrator, which needs the “create” command when it is instantiated:
    public class CreateTaskOnAccountCreationOrchestrator : ICreateTaskOnAccountCreationOrchestrator
    {
        private readonly ICreateTaskCommand createCommand;

        public CreateTaskOnAccountCreationOrchestrator(ICreateTaskCommand _createCcommand)
        {
            createCommand = _createCcommand;
        }

        public void Execute(PluginBase.LocalPluginContext pluginContext)
        {
            createCommand.Execute(new CreateTaskModel()
            {
                Subject = "Send e-mail to the new customer.",
                Description = "Follow up with the customer. Check if there are any new issues that need resolution.",
                ScheduledStart = DateTime.Now.AddDays(7),
                ScheduledEnd = DateTime.Now.AddDays(7),
                Category = pluginContext.PluginExecutionContext.PrimaryEntityName,
                RegardingObjectId = new EntityReference(pluginContext.PluginExecutionContext.PrimaryEntityName, pluginContext.Target.Id)
            });
        }
    }
However, the command also needs two other parameters when it is instantiated:
    public class CreateTaskCommand : ICreateTaskCommand
    {
        private readonly ITaskFactory _factory;
        private readonly IOrganizationService _service;

        public CreateTaskCommand(ITaskFactory factory, IOrganizationService service)
        {
            _factory = factory;
            _service = service;
        }

        public void Execute(CreateTaskModel model)
        {
            var task = _factory.Create(model.Subject, model.Description, model.ScheduledStart,
                model.ScheduledEnd, model.Category, model.RegardingObjectId);
            _service.Create(task);
        }
    }
Creating a class instance and passing in the Organization Service from the plugin
Without Ninject and inversion of control, we would need to create all the objects and supply the necessary parameters to all the constructors. Instead, we simply tell Ninject to bind the interfaces to the classes that implement them and sometimes specify parameters, for instance for the command:
public class ContainerWrapper
    {
        public static void SetupDepencendyResolver(LocalPluginContext localcontext, IKernel container)
        {
            container.Bind<ICreateTaskOnAccountCreationCommand>().To<CreateTaskOnAccountCreationCommand>();
When Ninject creates the CreateTaskOnAccountCreationCommand object, it will choose the most complex constructor and create the necessary objects. In this case, it will create an instance of the CreateTaskCommand object and pass it to the CreateTaskOnAccountCreationCommand constructor. To create the CreateTaskCommand object, it will create an instance of the TaskFactory object and pass it to the CreateTaskCommand constructor as well as the OrganizationService instance that the plugin supplied when it ran.
    public class ContainerWrapper
    {
        public static void SetupDepencendyResolver(LocalPluginContext localcontext, IKernel container)
        {
            container.Bind<ICreateTaskOnAccountCreationOrchestrator>().To<CreateTaskOnAccountCreationOrchestrator>();
            container.Bind<ICreateTaskCommand>().To<CreateTaskCommand>().WithConstructorArgument<IOrganizationService>(localcontext.OrganizationService);
            container.Bind<ITaskFactory>().To<TaskFactory>();
        }
    }
Coming back to the why
In brief, all this hiding away of the implementation details makes the code easier to read and to understand. Indeed, when you decouple the plugin stub from its implementation, it becomes easy to replace it and test it. In fact, we are detached from the implementation of concrete plugins. This streamlines the swapping out of the implementation details for another implementation, and it can be done all in one place. It also simplifies the logic testing in each of the classes, because we can implement an interface that tests the respective bits of code without testing the whole thing.
So, the advantages of doing all this are to:
Focus on the use cases.
Keep the code cleaner and easier to understand, maintain, and test.
Be more decoupled to simplify the swapping of pieces of the code.
Ultimately, this practice is most beneficial in large projects, but not worth the effort in small projects such as our example. Nevertheless, this example does illustrate the principles that can be applied in a large project.
This article was originally posted here and is archived over here.
An error occurred on your Dynamics 365 portal? Did you know it was possible to record relevant details and consult them? This way, more information on the causes of the error will give you clues as to how to correct it. But how can one do it, you may ask? By connecting Dynamics 365 to Azure for error logging!
Before we start, make sure that:
your organization runs the Microsoft Dynamics 365 Portal;
it runs online (and not as an on-premise software);
you have an MSDN account with a $150–$200 credit on Microsoft Azure.
Ready to fix bugs more efficiently? In only twenty minutes, you will make a simple adjustment that will make your work easier. In this article, you will learn how to log future bug details on your platform. So, here are 3 simple steps to connect Dynamics 365 to the Azure cloud computing platform and log error information.
Configure Microsoft Azure (so it can get the error messages)
Configure Microsoft Dynamics 365 (so the platform saves error details)
Test it out (to see the bugs)
Why log portal errors?
For example, you are currently developing your organization’s client space. While doing so, a bug occurs. After having configured these settings, you will be able to fix the issue more easily. Simply knowing the date and time of the bug will allow you to find out exactly what created the anomaly.
1. Open MSDN (Visual Studio) to configure error logging
First, select your environment, then click on the Portals link.
b. Select “Manage”
Then go to the section that will allow you to manage your portals.
c. Update the diagnostic logging configuration
Under Portal Actions, update the diagnostic logging configuration.
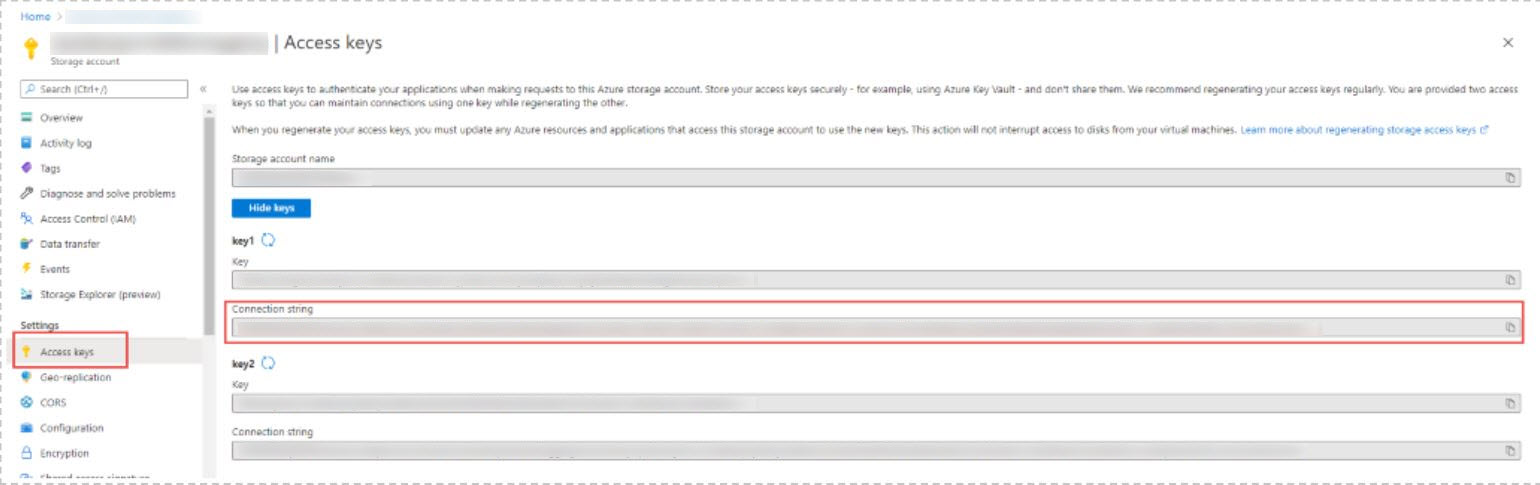
d. Paste the access key
You can now paste the access key you copied on step 1.g in the connection string:
3. Test your new error logging configuration
It’s testing time! Now that you’ve configured Azure so it can receive error messages and Dynamics 365 so it can save them, you’re ready to see it in action.
a. Generate a bug!
In your portal, carry out the action that usually produces an error. Then, go back to your storage account and click “Open” in Explorer.
b. Open the blob container and the telemetry logs
Now open the “blob container” section to reach “telemetry-logs.”
c. Find the latest file in the results
Then, keep double-clicking until you find the relevant date and time, and download the latest file.
d. Inspect the lines
You can now open the file in a text editor (e.g. Notepad++). Go to the end of the file and inspect the lines there.
For example, this is what it could look like:
All errors are now being logged!
From now on, all errors will be recorded, and you will be able to consult them at any time. Fixing bugs will be a piece of cake!
If you are a CRM developer, you make work on Virtual Machines (VMs) to test out your work. You may have noticed that CRM through the above versions has a certain point of intersection for a platform where all versions are supported. In other words, if you install a VM with Windows Server 2012 and SQL Server 2012, in that environment you can install any of those 4 versions of CRM on premise, allowing for minimal changes. You can even do that in Azure if you want a multi-machine installation.
The most challenging one to install in that environment, though is CRM 2011, since you need to use the Self-Healing setup (SHS) to successfully install CRM 2011 on Windows Server 2012. Sometimes it manages to download itself, but not always, so here is the procedure to so do, step by step.
Most of it you can find here. Here are the bits of information that I found were helpful to complete that page. From the SHS download, extract from the .cab file the .msp file it contains and place it in c:\temp. Here is the contents of your config.xml file, assuming you are installing CRM in English:
The blog does a good job of explaining that you need the install files from CRM 2011 with Update 6, then you integrate the SHS, and your install should run fine. Of course, I suggest you install UR18 afterwards.
You can then uninstall CRM 2011 and install any of the other versions of CRM at your leisure, without changing the infrastructure. Here is a nice list of the various available updates for those versions of CRM.
I’ve been having persistent problems with labels in managed solutions. It is true that if we do unmanaged customizations on the form of an organization which contains managed solutions, these unmanaged customizations prevail. But having done that mistake more than a few times, I’ve had the problem occur again and again and I’ve started suspecting that this was not quite the issue. So, here is the simple test. In this scenario, I have a custom entity which at version 0.0.1.0, has certain labels for my custom fields as displayed here:
Then I adjust two of those attributes and change the display names. I notice that one of the labels changes automatically on the form but not the other so I adjust it. I save, publish, export a new version 0.0.1.1 of the solution and import again into my managed environment. Lo and behold, one of the labels is not updated!
As you can see, the label that was not updated contained a label different than the display name at first, but not the one that was sucessfully updated.
So what’s the reason? It seems that if the label was not equal to the display name, you can only update it if the updated label is also different that the display name. It’s also possible to update the label if was always the same as the display name. Otherwise, the workaround is to delete the field off of the form and replace it there, thereby updating the cell guid, in which case you’re ok to go. Thanks to my collegue Éric Régnier for pointing this out!
It sure gave me headaches at the Customer site but with this workaround, the labels can be fixed. Hope it can help you out too!
Business closures in Dynamics CRM are dates in the calendar where the business is closed and they are not considered as open days in certain calculations such as Service Line Agreements which are calculations of how long it took to complete a service for a Customer. Examples of such days are Christmas, Thanksgiving, Good Friday and New Year’s Day. My collegue Salim explains well here how to retrieve the currently stored business closures in Dynamics CRM.
While they can easily be added through the user interface, it can be interesting to import them programmatically so that any number of organizations can be synchronised with a source file.
First we’ll retrieve the existing list of business closures. However, we need to use late binding to be able to update the business closures once they are retrieved.
The duration indicates how many days the closure lasts, and it can be one day or more. If it is more more than day, the end date should be different than from the start date. The other parameters are what CRM puts by default when creatings a Business closure from the user interface.
Once you’re done adding the business closures, update the attribute and save the entity. That’s it!
businessClosureCalendarEntity.Attributes[“calendarrules”] = collectionCalendarRules; UpdateRequest up = new UpdateRequest(){
Target = businessClosureCalendarEntity};
ServiceProxy.Execute(up);
You may need to adjust the parameters according to what CRM puts in them when they are populated via the user interface. I hope this helps. I tested it with CRM 2011.